Showing posts with label recipe. Show all posts

Monday, May 12

It's not Rocket or Pocket, it's Croquettes!

I have been wanting to make croquettes for my kids for a while, and since I am going out with some friends and their kids today, I thought why not. I will make them and bring them along with me.

My son asked me what I was doing, I told him, "I am making croquette!" He laughed and couldn't stop teasing me by mispronouncing it deliberately, calling it "rocket" or "pocket".

If you have children or love potatoes, why not try this yummy recipe - Bacon and Cheese Croquette

Ingredients for 8 croquettes:
- 5 small potatoes
- 5 slices of bacons
- an onion
- 2 slices of cheese
- 1/2 tsp of salt
- 1 small piece of butter (optional)
- an egg
- some flour (I use gluten-free flour, but you can use normal flour)
- some bread crumbs (I use Japanese bread crumb)
- some vegetable oil for deep frying


And here is how you do it! 

Boil the potatoes until a fork can pass through them.


While the potatoes are in the pot, use the time to chop up the onion and bacons.


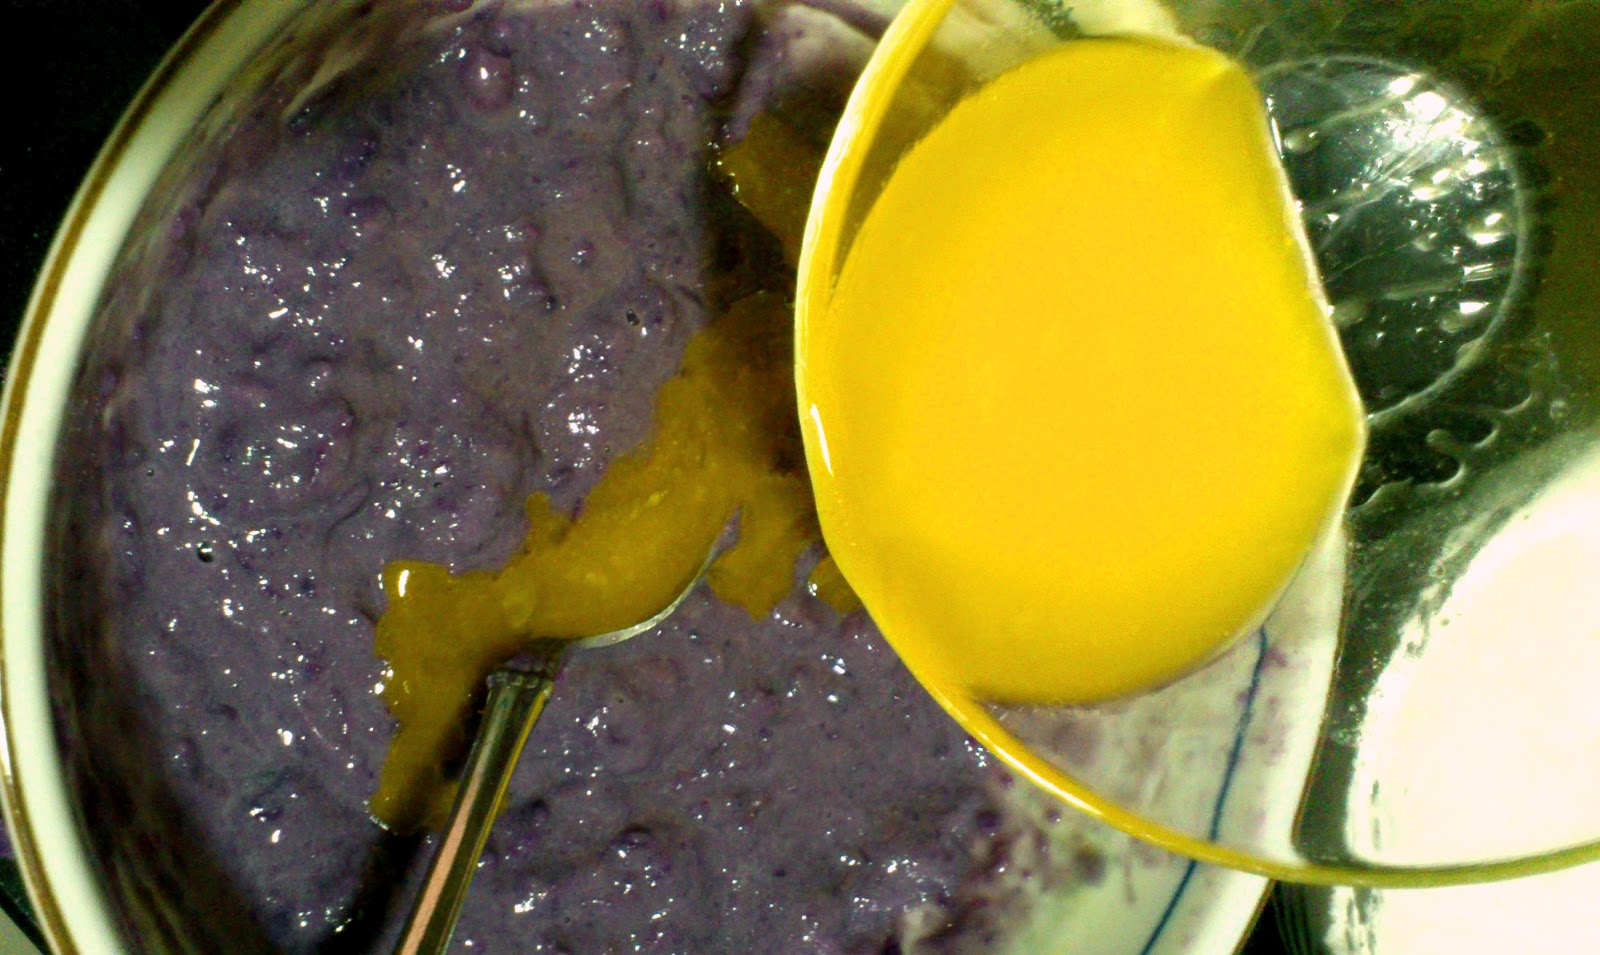
Fry the bacons. If you are using a non-stick pan, you don't have to use any oil. When the bacons start oozing out oil, add in the onions. Stir fry them until onion is soften and bacons are browned. 


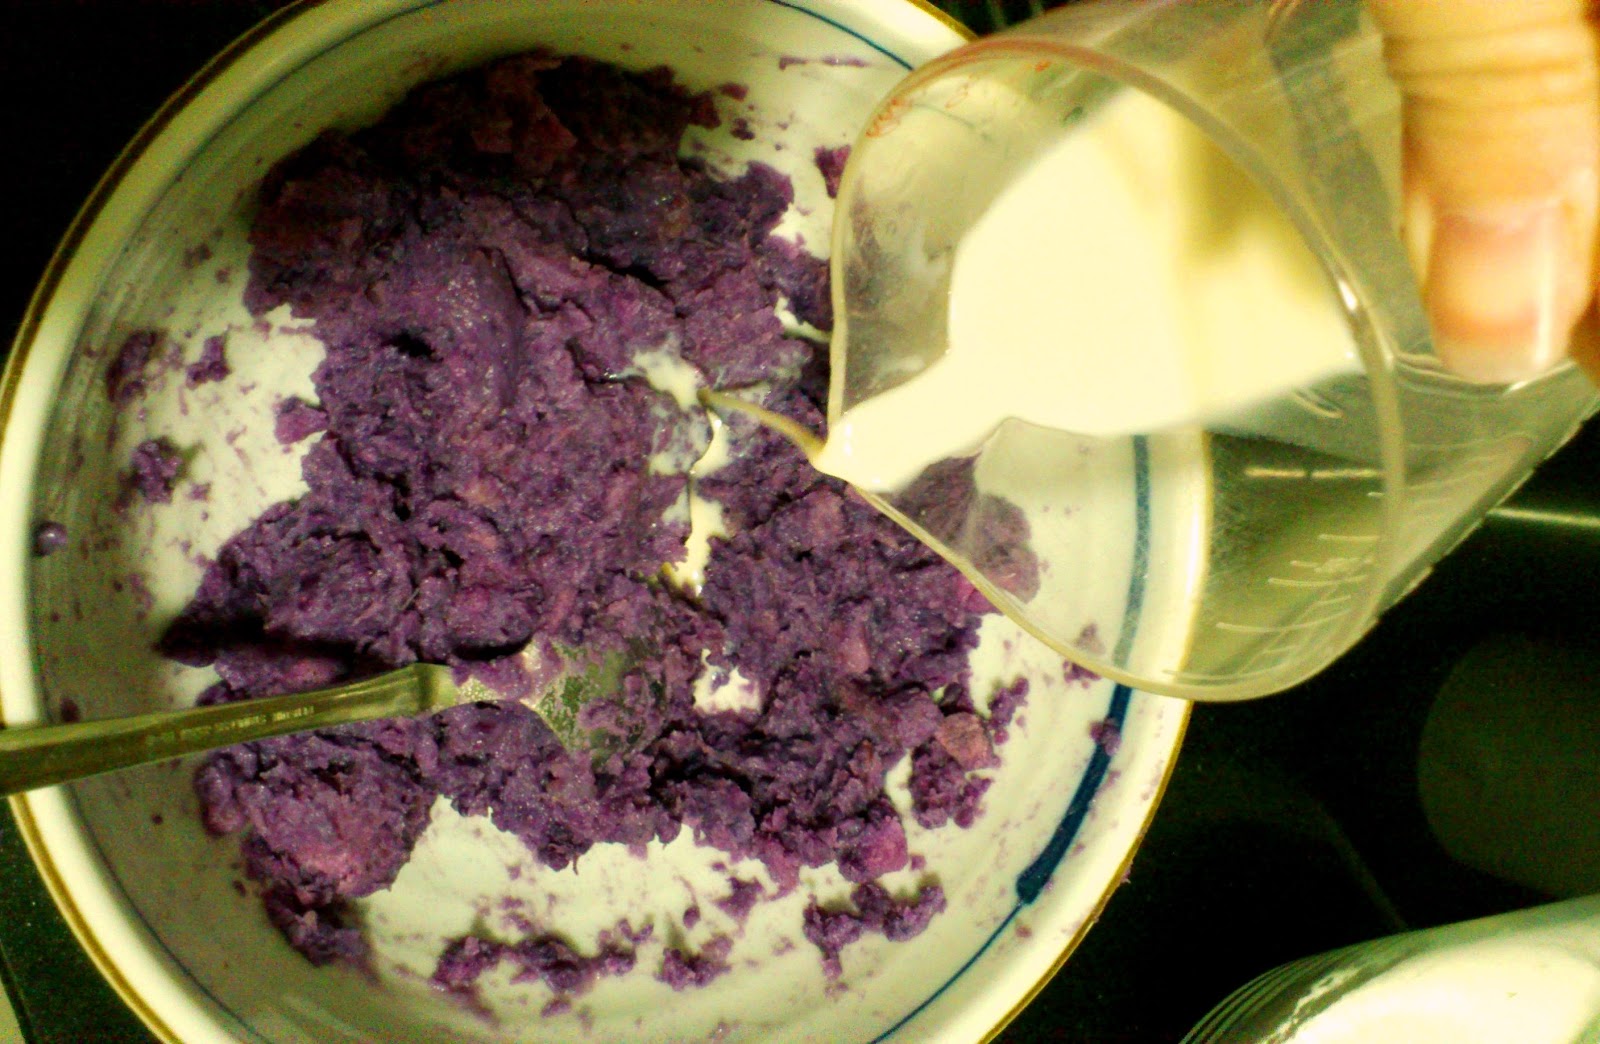
When the potatoes are ready, peel the skins off under running water while the potatoes are hot, the skins will come off quite effortlessly. Then put the potatoes, salt and butter in a large bowl and mash them up.


Then add in the bacons and onion to the mashed potatoes. Mix them well.


Divide the potatoes into 8 portions. Take one portion and flatten it onto your palm, add a quarter slice of the cheese in the middle and fold the potato's edges to the middle, so that the cheese is hidden right inside. Then shape the potato into an oval shape.


Put flour onto a large plate and lay the shaped potato onto the flour to prevent them from sticking onto the plate. Turn the potato over and coat it evenly with flour.


Next, beat an egg in a wide and shallow bowl or plate and pour the bread crumbs into another similar bowl.


Dip the flour coated potato into the egg and then coat it with the bread crumbs.


Make sure the potato is coated evenly with bread crumbs.


When the oil is hot, gently put in the potato. Do not flip it immediately or it might break into pieces. Wait for the crumbs to harden before flipping the potato over. Use medium to medium high heat, fry for just 2 mins or until it turned deep golden in color.


Drain the oil off before serving.


It's good as a snack and perfect with a bottle of beer! I mean, beer if you are an adult. Hehehe...

You can also make it into a vegetarian style, but replacing the bacons with corns kernels. Or if you prefer meatier version, you can use minced beef instead of bacons. They will taste good anyhow.


Wednesday, April 30

Keep Calm and Eat Dessert!

Some times work can get pretty crazy. I see some of my co-workers skipping lunch because of stress, I really feel bad for them.

I don't usually feel stressed up easily, but when I do, I crave for desserts! STRESSED spells backward gives you DESSERTS! I know, that's sinful. So why not make some desserts that is healthier, like this Coconut Mango Pudding with real mangoes and very little sugar.


Ingredients for 5 servings:
250ml coconut milk (not coconut cream)
1 cup of mango puree (made from ripe mangoes)
2 tsp of gelatin powder
a pinch of salt
1 tbsp of sugar
optional - mint leaves for decoration (I happened to plant some myself. Organic!)


Instructions:
1. Cut up 2 large mangoes (or 3 small ones).
2. Save some mangoes for decoration later.
3. Put the rest into a food processor and process it until you get a smooth puree.
4. Put coconut milk in a pot, add in the gelatin powder, sugar and salt. Use low heat. Stir to dissolve the gelatin, sugar and salt. Remove from heat before the mixture boil.
5. Mix in the mango puree. Stir thoroughly until the mango puree completely blended with the milk mixture.
6. Pour the mixture through a fine sieve into your pudding containers. I am using wine glasses, but you can use any glass bowls or even plastic cups.
7. Chill for at least 4 hours.
8. Before serving, spoon the cut mangoes cubes onto the pudding and decorate with mint leave if you like.


This recipe gives you a different mango pudding from the ones you normally get from those Hong Kong cafe. It has a distinct coconut flavour and the color is more like a pale mustard than bright orange (because there is no food coloring added). Enjoy and de-stress!


Wednesday, March 26

Cooking Lion's Head Casserole Made Easy

Firstly, I want to declare that NO LION was ever harmed or killed for this dish of mine. Why the funny name, Lion's Head Casserole? It's probably the large meat balls in this dish that resembled lion's head, while the regular sized meatballs are probably looking like cat's head beside it. Oh.. whatever.. as long as the dish is tasty who cares about the name. Here are the ingredients:

INGREDIENTS A
- 1 pack of minced pork (I use frozen pork)

- 10 to 12 prawns, chopped into small pieces
- A handful of finely chopped water chestnuts
- 1 egg, lightly beaten
- 1 tablespoon of Chinese rice wine (I used nu-er hong, but you could use anything, even brandy)
- 1 tablespoon of light soya sauce
- 1 tablespoon of sesame oil
- 1 teaspoon of sugar (fine type)
-1 tablespoon of cornstarch (You'll need another 2 tablespoon set aside for thickening the broth at the end of the cooking)

INGREDIENTS B
- 2 to 3 tablespoons of oil for frying the meatballs 
- About 800 ml of chicken broth (You can get instant one like me if you are lazy) 

- Half head of Chinese cabbage washed, drained, cut into 2 or 3 sections (Picture above is only half the portion, as I had added the other half before I took this photo)
- Some chopped up garlics (not too finely chopped, you want it big enough to be seen even after cooking)


How to cook? Easy


Preparation:

1. In a bowl, combine all of Ingredients A and mix them up with a spoon. Keep the mixture covered and chill in the fridge over night.

2. The next day, form the pork mixture into large sized meatballs. Dampen your hands with water so the mixture will not stick to your hands when you try to mound them. Flatten the balls slightly, but not too flat like a patty.

3. Heat the oil in a pan on medium-high heat. When the oil is ready, add the meatballs. Cook until browned on the bottom before flipping it to the other side so that the balls will not break up into pieces. 


4. When the meatballs are done, lift them off the pan and put them aside. Bring half the chicken broth to boil in a large pot. Add just half of your Chinese cabbage (especially the stem parts) and the garlics, cook until the cabbage soften up.

5. Add the meatballs, reduce the heat and top up the rest of the Chinese cabbage and broth, covering the meatballs. Simmer for at least 35 minutes with half-covered lid. I like to keep it simmered longer so that the cabbage melts in my mouth when I eat. 


6. Thicken the broth with cornstarch.

7. Serve hot with some plain rice. Yumms!! 


Happy eating the lion, without really killing one. 

Monday, February 3

Choco Bananas with Chocolate Bits Muffins

This recipe is too good, and too easy, not to share. I guarantee your kid/s and/ or even yourself would love them! I could stop eating them, even though I am not really a fan of bananas.


Ingredients:

120g of self-raising flour (20g to be mixed into the chocolates)
100 g of sugar
1 pinch of salt
2 1/2 tsp of cocoa powder (unsweetened)
2 eggs
2 large overly ripe bananas
1 tsp of vanilla essence
55g of butter (melted and cool to room temperature)
50g of chocolate chips or chopped up chocolate mixed with 20g of flour (so that the chocolate would not sink to the bottom of the muffins when you bake them)

Steps (super easy, I am not kidding you)

WET MIXTURE
-Mash the banana up with a fork (My 6 YO daughter helped me with that)
-Crack 2 eggs into the mashed banana and whisk the mixture
-Pour in the melted butter and the vanilla essence, whisk to mix well

DRY MIXTURE
-Mix the flour, salt and sugar together
-Pour in half of the wet mixture and fold in the dry mixture, then the other half, mix well
-Sift in the cocoa powder and them fold it in
-Pour in the chocolates and fold those in as well

-Put them into muffin cups and bake at 280 degree for 20 minutes. Done!

I used gluten-free self-raising flour and margarine, but you could use the normal flour and butter just the same. For chocolates, I had some leftover Lindt Swiss Thins, you could replace it with any chocolate chips, however a good quality chocolate would give you a better overall taste.


Happy Baking!

Thursday, August 22

8 Easy Steps to a Tantalizing Tiramisu

Tiramisu has always been one of my favourite dessert. I don't want to just eating it, I want to make it! You should have realized by now, that I am an aspiring domestic goddess!! Perhaps I could be the next Nigella Lawson? Anyway, I had successfully made an ass-kicking tiramisu for my family, so tantalizing, it had completely annihilated my diet plan.

That day I posted a picture of the tiramisu I made on Instagram and FB and had received request to share the recipe, so here it is...


Ingredients:
1) 3 Whole eggs
2) Mascarpone cheese - 500g 
3) Vanilla extract - 1 tea spoon
4) Gianduia Chocolate Liquor 1 cup (I am not too crazy over coffee, but you could use espresso and rum like most recipes. It's just my personal preference, plus I happened to have a bottle of chocolate liquor sitting on my shelf. Btw, Baileys Irish Cream makes a good substitute too)
5) Whipping cream - 200ml
6) Unsweetened cocoa powder - 1 and half table spoon (I choose Hershey's cocoa)
7) Italian ladyfingers, not the fresh vegetables ok! - About 1 whole pack (I go with the brand Vicenzovo)
8) 50g white sugar

Instructions:
Step 1) Whisk egg yolk
Separate the 3 whole eggs, egg yolks in one bowl, and whites in another. Whisk the yolks with 25g of sugar in low to medium speed until the mixture become lighter in color and creamy in texture. Add in 1 teaspoon of vanilla extract and whisk again in low speed until the mixture is pale and slightly thicker. 

Step 2) Fold in the cheese
Add 500g mascarpone cheese to the mixture and fold it in with a whisk or spatula until you get a smooth mixture.

Step 3) Whisk whipping cream
In another mixture bowl, add 200ml of whipping cream whisk in medium speed until the cream become stiff and thick.

Step 4) Whisk egg whites 
Use a clean whisk is very important for whisking the egg whites with 25g of white sugar in low to medium speed until the egg whites become fluffy and stiff.

Step 5) Mix all 3
Fold in the whipping cream back, followed by egg whites to the cheese and egg yolk mixture. Mix all the ingredient well until it resembles a creamy paste.

Step 6) Prepare the ladyfingers
Dip ladyfingers into chocolate liquor, and then lay the ladyfingers at the bottom of deep glass container. (mine is measured 20cm x 19cm x 7cm). After the bottom is laid with a layer of ladyfingers, add half of the creamy mixture. Repeat the process for the second layer.

Step 7) Cool it
Put the glass container in the fridge for at least 6 hours. But personally, I feel the tiramisu will taste much better after 1 day in the fridge.

Step 8) Finish up with cocoa powder
After 6 hours or more, sieve the cocoa powder to the top and your tiramisu is ready!


Published with Blogger-droid v2.0.10

Wednesday, October 3

Raisin muffins with Streusel toppings.


Last week, a colleague of mine shared with me her recipe of making muffin more interesting and delicious with streusel toppings.

Streusel is basically a crumb topping that can be baked on top of cakes, pies or muffins. Its origin is German, I think.

So here I am trying out a new recipe for my gluten and lactose intolerant kids - Raisin muffins with Streusel toppings.


Here is what you will need for 12 medium-sized muffins:

Dry Ingredients
*115g of gluten-free self-raising flour
*100g of white sugar
*1 pinch of salt
*60g of raisins

Wet Ingredients
*1 egg
*1 tsp of vanilla essence
*50ml of soy-based milk
*50 ml of cooking oil

Ingredients for Streusel Toppings
*65g of gluten-free self-raising flour
*70g of light brown sugar
*40g of cold canola spread
*20g of chopped almond nuts


This is what you need to do:

Mix all the dry ingredients up in one bowl and mix all the wet ingredients up in another bowl, then make a 'well' in the middle of the dry ingredients. Pour in the wet ingredient mixture into the 'well' and fold in the dry ingredients gently. Spoon the batter into the muffin cups. Fill it only half full.

Now for the streusel toppings. Mix the flour, brown sugar and chopped nuts together, then add in the butter. Either blend in the butter with finger tips or use a fork to cut in the butter until the mixture resembles dry bread crumbles.

Sprinkle the streusel toppings on top of the muffin batter and bake them for 20-25mins.


Recipe tested! Love the slightly hard and crunchy crumbles of the muffins! Maybe more nuts will make it even better.


Monday, July 16

My Purple Muffins

I couldn't resist the purple sweet potatoes when I was doing my grocery shopping last weekend because purple is my favourite color. Hahaha... Not just that, but I was scouting for a new recipe for my muffins and purple sweet potatoes seem quite exotic for muffins and healthy too.

Here are the ingredients for 15 small muffins:

*115g of self-raising flour (mine is gluten-free)
*100g of white sugar (I made my muffins not too sweet because they are meant for my children, you can add more sugar if you like them sweeter)
*a pinch of salt
*1 egg, medium size
*55g of butter, melted and cooled to room temperature (I substitute butter for olive canola spread)
*230g of purple sweet purple, steamed or baked then mashed up slightly (sweet potato of other colors are just fine, but I just love purple!)
*100ml of milk (mine is soy-milk)
*50g of chopped nuts (I used almond)


Here is how you do it:

Preheat your oven at 175 degree.

First, add milk to the sweet potatoes and mashed them up slightly. Leave some chunks of sweet potatoes, they will give your muffins a wonderful texture.


Then add in the egg and mix it well with the sweet potatoes.


After the egg is completely blended with the sweet potatoes, add in the melted butter, bit by bit and stirred until they are well mixed up.


In another bowl, mix the flour, sugar and salt up with a whisk, then add in the sweet potatoes mixture. Fold the dry ingredients over the wet ingredients until the mixture is consistent.


Lastly, fold in the chopped nuts.


Scoop the mixtures into baking tray lined with muffin cups. Filled up to 3/4 full will do.


Baked them in the oven for 20 minutes or until a toothpick inserted comes out clean.


Delicious and naturally colored muffins are done! Love purple!


Soft and fluffy. It's good to eat it on its own.


But I like mine wedged with a thick slice of salted butter. Mmmmmm... so sinfully good. It's impossible to stop at just one!


My purple sweet potato muffin recipe can be used for gluten and dairies free baking as well as normal baking.

Monday, July 2

Peanut Butter Blondies - Easy and Delicious

My son was sick for a good 10 days and during those days, he would refuse to eat. I was so worried.

His doctor told me to give him anything he loves, regardless of the nutrition value, just to get him to have some food into his stomach.So I baked this irresistible Peanut Butter Blondies which is high in energy and wonderfully delicious. At the same time, it's so easy to bake, even mummies who has never bake before can do this without a sweat.


Ingredients:

50g of unsalted butter, melted and cool to room temperature (I use Olive Canola Spread for my kids)
140g of self-raising flour (I use gluten-free self-raising flour for my kids)
1/4 tsp of salt
1 egg
160g of brown sugar (You can use normal white sugar but brown sugar taste much better.)
1 tsp of vanilla essence
100g of chunky peanut butter
30g of chopped peanut or almond
*optional - handful of rainbow sprinkles or chocolate rice


Instructions:


Pre-heat oven at 180 degree. Beat the egg and brown sugar with a hand-mixer for 2-3 minutes or until light and frothy. Mix in the vanilla essence and then the melted butter. Then add in the flour and salt slowly until the batter is smooth. Fold in the peanut butter and chopped nuts.


Pour the batter into a 8' x 8' or 6' x10' pan, lightly greased and lined with parchment paper. Smooth the top and then sprinkle the batter with rainbows or chocolate rice. Pop the pan in the oven for about 25-30 mins, or until the top of the blondies become dry and look golden brown. Remove from oven and place the pan on a cooling rack for at least 20 min before cutting.


They taste heavenly with vanilla ice-creams. But don't say I didn't warn you, they are fattening as HELL!


Published with Blogger-droid v2.0.6

Sunday, March 11

Cooling Sweet Tonic


There is this nasty dry type of cough that always pesters my children during their bedtime. I have long given up hope looking for that miracle cough elxir.

Last week, I spotted some long-forgotten Chinese Pears in my fridge and decided to boil them with my left-over white-fungus (also in my fridge).

This sweet dessert is believed to be good for nourishing the lungs, relieving dry cough and 'cool down' the body heatiness, suitable for both young and old. And best of all, it is such a brainless receipe for anyone.

Ingredients:

1 large Chinese Pear - cooling
1 handful of Dried Red Dates - balance the 'qi' in the body
1 tbsp of Apricot Kernels (Xing Ren) - improve coughing
1-2 large White Fungus (Xue Er) - nourish the lungs
Some Rock Sugar to taste. For young children, you can dilute with some water before serving.

Directions:

Soak white fungus for 20 mins or until soften. Wash the white fungus and trim off the harden parts. Wash dried red dates and break them open (optional to have the seed remove). Rinse the apricot kernels and set aside. Remove the pear's skin and seeds, then cut it up in big chunks.

Bring 800-1000ml of water to boil. Throw in the pear, white fungus, red dates and apricot kernels. Simmer for 1 hour. Add rock sugar to suit your taste. And all done!

It can be serve chill but no recommendable for younger children, serve warm would be better for them.

Make it for your family today!


Published with Blogger-droid v2.0.4

Friday, December 23

Gluten-Free Baking

Some months back, we found ourselves thrown into the world of gluten-free when our two kids were found to have food intolerance (which explained why they were always wheezing and coughing). They were reactive to gluten and dairies, which simply meant that they have to kiss goodbye to cakes, biscuits, cookies, pastries, pizzas, ice-creams, muffins, breads and so much more.

It's so hard to be different, especially when food intolerance is still kind of an alien to many Asian parents. Many people do not understand why we freaked out when someone insisted that a tiny piece of cake is OK for our kids. It's also very heart wrenching to have our kids watched as other normal children gulped down all those wonderful and sinful goodies made from wheat flour, while they can't touch any of those.

So I decided I don't want to deny my children of their childhood, and no, I am not going to cave in and start 'poisoning' them with commercially-baked products. I am going to be my children's personal baker.

One of the first recipe I tried was Banana and Walnut Muffins from Joy of Baking. I simply substitute the flour and baking powder with gluten-free self-raising flour, and for melted butter, I used rice bran oil in its place. The result was unexpectedly delicious. I went on experiment with blueberries and had such a huge success that boosted my confidence to bake more.


Bite-sized blueberries muffins I made for my kids' school's potluck.


Recently, I found this Betty Crocker's Gluten-Free Cake Mix at Fair Price Finest. I was over the moon! I tried its Devil's Food and was surprised at how much it tasted just like normal cake, if not better, even though I had to swop butter for Planta.


There's more to life than being intolerance towards gluten and dairies and I am loving gluten-free baking!


Published with Blogger-droid v2.0.1

Thursday, August 11

Bread and Butter Pudding will save the day

Yesterday morning, I received a telephone call from my gynaecologist; it was news that wasn't very pleasing. Although, I kept reassuring myself to stay positive; it still had me thinking.

If I die one day, would I have anything that I might want to pass on to my kids so that I can be remembered by. That afternoon, I showed Laetitia how to make a simple dish, using 'recycled' bread from our fridge. I know she would surely love my recipe for Bread and Butter Pudding. And I was right! Laetitia couldn't stop eating it.


Ingredients:

5-6 slices of bread (I used leftover corn bread, but any bread is fine)

2 cups of milk (I used the free samples baby's formula)

2 eggs (small to medium size)

Half cup of brown sugar (white sugar will do too)

A handful of raisins

1 tsp of vanilla essence

A pinch of salt

About 2 tbsp of butter for greasing the pan and buttering the bread.


Instructions:

1) Preheat oven at 175 degree and grease a 24cm x 20cm baking tin well with some butter.
2) Cut the bread up into quarter or smaller pieces and butter both sides of all pieces of bread.
3) Beat up the eggs lightly and pour in the milk, then whisk them up gently.
4) Pour in the sugar, vanilla essence and salt. Continue to whisk until the mixture is consistent.
5) Line the bread pieces up in the baking tin, sprinkle some raisins on top and pour in half of the mixture, passing through a sieve.
6) Lay a second layer of bread pieces, sprinkle the rest of the raisins and pour in the remaining of the mixture, passing through a sieve.
7) Press lightly on bread pieces to ensure that the mixture soaks through well.
8) Pop the baking tin into the oven and bake for 45-60 mins until you get a golden colored top.
9) You can pass through a fork in the middle and if it comes out clean the pudding is ready.
10) Set it to cool for a while before cutting.


***********************


Tomorrow, I would be having a surgery to remove the pre-cancerous cells found in my cervix. I know, many of you might be worried reading about this. But please chill, you would be helping me, by believing that I would do well.

If you are still feeling down for me, use my recipe and bake yourself some delicious Bread and Butter Pudding. Trust me, baking therapy does you good!


Friday, August 27

Love My Baked Oysters with Cheese

Sometimes I hear married woman, who can't cook, rave about her incompetence as though it was a proud achievement that affirm her status of a modern wife, I can't help but wonder if she know what she is missing.

I am traditional. OK, only in certain context. I like to cook for my man and watch him savour my simple delights - food. I believe a good way to a man's heart is through his stomach. I already say, I am traditional.

My latest experiment: BAKED OYSTERS WITH CHEESE!


It's damn easy, just fresh oysters top with Mozzarella and Parmesans cheese. Oh btw, I shucked those oysters on my own too!

It's such bliss watching Mr Hubby wolfed down 3 of my baked oysters at past midnight, after he came home exhausted from a long day. ;)

LinkWithin

Related Posts Plugin for WordPress, Blogger...